Friday, April 29, 2011

Tutorial - Toddler Cowboy or Cowgirl Chaps


In response to some questions, and after using and abusing these chaps for a year, here are some updates:

First, this pattern assumes that a) you know your way around a sewing machine.  It is not a hard project, but I don't explain how to thread your sewing machine, for example.  b) that you are comfortable "winging it" with play costumes.  As you can see from the photo, I didn't make anything exact or perfect.

Second, the velcro tabs work great to close the legs.  However, not so great at the waist.  I ended up replacing the belt with one from a thrift store that I cut down to my toddler's size.  He is working on buckles anyway, so it is good practice, and the velcro buckle was not holding.  Ditto the velcro tab for the lasso.  I would definitely replace velcro with a snap or a button - however, my son isn't really that into the lasso, so in the end I just cut that tab off. 

Good luck!  Link to a photo in the comments!

In making costumes, even for toddlers who wear them everyday, I'm not one to get too precious or make sure that every stitch is perfect. In my recent experience with my 4-year-old, costumes are a favorite for a few days, and sometimes get recycled a month or even a year later. The obsessions seem to come and go quickly. Heirloom-quality they do not need to be.

Costumes for pretend play - whatever the obsession - do need to be a few things. They need to be simple to put on "by myself." They need to be comfortable. They shouldn't have certain pieces that "have to" go a certain way - because most toddlers seem to be tinkerers. J came to me with the chaps completely dis-assembled in about 5 minutes - mostly because he wanted to see how everything worked. So this pattern doesn't have a lot of fussy things, uses velcro, and can be completely taken apart and put back together without undoing all your work. It also folds up small in our dress up suitcase!

You will need some other accessories (not shown here). Jeans are good, although any plain trouser pants work too. A flannel shirt will work if you don't have a western one with those fancy pearl snaps (but oh, my J would love one of these). A neckerchief (a red triangle of fabric will work). A hat (but of course). A vest is optional in my opinion. Cowboy boots, or any boots. You will see that these chaps come with a lasso. Here is how to tie one. Ours is made of inexpensive sisal rope from a home improvement store.

Ready? Let's go rope some dogies.


Here is the end result, so you can keep this in mind while we go through the steps. Some of the pieces look a bit weird, but it will all work out! I recommend reading through the whole tutorial first to come to grips with the ideas before cutting.

You will need about 1/2 a yard of chap fabric (I used brown duck cloth, you could use pleather, cow-patterned fleece, whatever you fancy); a scrap of buckle fabric (I used yellow felt); velcro, and sisal rope for the lasso.


Here are the pieces. I measured everything against a pair of jeans that fit my 4 year old. The belt is 24 in by 4in. The tabs are about 6 in long.

The violin-shaped chap pieces are as long as his jeans plus 2 in for turnover at the top. The chaps need to be the width of one pant leg, since they are going to "wrap" around the outer part of the leg and fasten around the inside with velcro'd tabs. I just eyeballed the shape - draw a curve down to the crotch for the front and back, then another slight curve in at about the knees on your kid's jeans. Round off the bottom. Trust yourself. They don't have to be perfect, they just need to be evocative of the wild wild west!


Here is the belt. Fold and press in half lengthwise, then fold and press the raw edges in to meet at the center and re-press in half. Stitch down the fold and close in the ends. Alternatively, you can use an existing belt, even one with a big fancy cowboy buckle. If you do, make sure that your chaps have a deep enough tunnel at the top to thread the pre-existing belt through.


Next, fold 1/4 in down on the top of the violin pieces. Serge or zig-zag the curvy edges all the way around, catching in the top fold. You could also hem all around but who wants to fuss with all those curves? If you use fleece or pleather you don't even have to finish the edges! Skip all the zigging and zagging! Why did I even use duck cloth?!


Next, fold down your tunnel for the belt to run through. Mine is about 2 in. Stitch down the fold over as shown above.


Your violin pieces will now look something like this. Lay them out wrong-side up with the rear seat together, as if your toddler were going to lie down face up on them to try them on. At least that helped me visualize how to lay out the tabs, pocket, and lasso loop.


Next, the pocket (on the left chap). I don't know if this is traditional, but it seemed to need something to compensate for its lack of lasso. I just serged the edges of the pocket and hemmed the top, then topstitched down. You could get fancy with the stitching here if you are that sort of person.


Here is the lasso loop on the right side chap. I folded a small tab and stitched it down the center, attached half of a velcro tab to one end, positioned it just below the belt tunnel on the right side out of the right chap, and sewed it down. I topstitched on the other half of the velcro where I had sewn the loop to the chap. To use the loop you just close the two velcro pieces together. You can see below how it will hold the lasso within easy reach of the right-handed.

UPDATE: having seen some heavy use, I have replaced the lasso loop fastening with a heavy duty snap. The velcro came undone too easily.

I imagine you mothers of the left-handed are used to modifying stuff like this for your south-pawed - one of the good things about sewing your own, right?


Now for the tabs to hold the chaps around the legs. The photo above shows you the positioning looking at the chaps right side up threaded on the belt for wearing.

The tabs are positioned on the bumps around the thighs and the calves. Fold the remaining 4 tabs in to the center lengthwise and topstitch to secure. Stitch half of the velcro to one end of the tabs, as shown.


Sew the non-velcro tab end to the bumps running down the rear of the violin piece. When the chaps are on, your kid is going to reach through his or her legs, grab the tab, and velcro it to the front of the chaps at the thigh and calf. The picture below shows the tabs and velcro on the right chap (the one with the loop for the lasso)


If you have a real belt with a real buckle you can use that now - just thread it through the left and right chap appropriately and toss the whole thing to your cowboy or girl.


Here are the chaps, tabbed together and laced up, viewed from the front.

I suppose it is a measure of the success of this costume that all action photos of the whole ensemble (plaid shirt, neckerchief, hat, jeans, boots) are too blurry to show!

Tuesday, April 26, 2011

Baby Sweater and Blanket


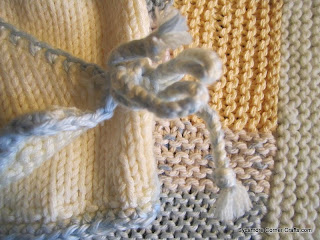
This is the Heartbreakingly Cute Baby Kimono from the first Mason Dixon Knitting book, and knit up so easily and quickly I feel like I could have made twenty more.


Then to bust some more stash, my first ever log cabin knitting, a baby blanket. So. Easy. I've started another one for Sweet P who asked very nicely and tried this one out to be sure it works. I wanted to make it reversible, but for the next one I'm picking up all on the same side, so there will be a right and wrong side, we'll see how that works. Thank you Mason Dixon Knitting!

Best of luck Sam!
Posted by Picasa

Sunday, April 24, 2011

Happy Easter!

I did find time for the crafty not candy Easter basket on Modern Parents Messy Kids. Sponge ball, stickers, matching game (downloaded) bunny nose, and two tiny robin egg chocolates.


Monday, April 18, 2011

Spring Coffee Cosy


My, this yarn from my stash is quite wintery. To spring it up, added a sprout. A multi-season cosy.

Thursday, April 14, 2011

Spring Greens II


A lovely Luna moth on a pine tree in our yard, fluffing her wings to fly. Love those feathery antennae. And what luscious color.


A project to keep my hands busy - crocheted bowls for no real purpose, just to have fun with a single ball of cotton yarn.

Monday, April 11, 2011

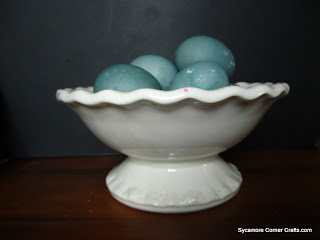
Natural Dye Easter Eggs for Spring

Easter is so late this year, I've been feeling the urge to get something spring-y on the table already. I saw this cover of Country Living and liked the idea of using natural food dyes, especially to get the blue color. I remember using onion skins to dye eggs when I was a kid, will have to try that next for some contrast. For blue, I sliced up a small head of purple cabbage, boiled 30 min in about 10c water, strained the leaves out leaving just the colored water and added 1/4c white vinegar.


Since these are for a decoration I wanted to keep unrefrigerated, I blew the eggs out (we used them in quiche - yum!) using a long metal skewer to carefully poke holes in both ends of the eggs and I also used the skewer end to break up the yolk a bit so it would come out more easily. Pretty easy, and when I immersed them in the dye I just held them under until they filled up with enough water to sink. Instead of boiling them again as the recipe directed, I left them in the hot dye bath to cool overnight. These are farm eggs from a neighbor, and started out a light tan color - so you can see the color did take well - it was interesting that the dye bath stayed red but the eggs came out blue.


The color layer was quite fragile when these came out of the dye the next morning - you can see how if you rub them before they are completely dry the color shifts around and leaves white patches. I did not rub them with oil - but was thinking they could be coated with clear acrylic craft spray to preserve them and wouldn't they be cute in a felted or paper mache nest on a mantle, or under a terrarium.


I would love to try marbleing them with onion skin or wrapping them with plants as in the cover shot - or spelling out spring as at Stitch/Craft - but I think they look lovely on our table as is and it was certainly a fun and easy craft, 30 min or so plus leaving them overnight.

Saturday, April 9, 2011

Dinosaur Party! Come on Over!

J turned four recently. FOUR. Oh, my. We had our first birthday party, all about dinosaurs!

Luckily it was just warm enough for outdoor play, although everything could have moved inside if necessary. The kids and I made dinosaur bones based on this Frugal Family Fun Blog post (and originally from Martha) Instead of paper mache and paint, we just wrapped them in cheap painting masking tape and buried them in the sandbox. J supervised the creation quite carefully, specifying what bones we would need for our skeleton. It gave us a good chance to look at all our dinosaur books and talk about fossils, science, and different kinds of dinosaurs. This guy was a definite meat-eater - look at all those teeth!


I bought a bunch of 99 cent brushes and the kids "uncovered" the skeleton, just like paleontologists! It helped that several of them had been to the Maryland Science Center where you can do this on "real" bones, on a larger scale.

After uncovering (so carefully! Amazingly for four year olds!) they got reburied and re-dug-up a couple more times - loads of fun.


We had a "dinosaur egg" hunt - a few of the eggs even had gummy worms hidden in them. Because everyone knows dinosaurs can't resist gummy worms.

After a meal of dinosaur mac and cheese (green) we decorated tar pit dinosaur cupcakes!


These were really so easy and they came out looking so awesome. I'm not really a huge fan of frosting, especially after the gummy worms and with all the chocolate. The cupcakes were from our favorite zuchini chocolate cake recipe (they are so good for you! Eat more!) The tar pits were vanilla yogurt with a bit of Ovaltine powder - chocolate-y without all the sugar of pudding and with the healthiness of yogurt. Sprinkled with Ovaltine on top it really looked like dirt - totally cool! We colored coconut green with food coloring for grass and placed chocolate granola on for boulders. Finally, an edible sprig of mint stood in for a prehistoric fern and each child got to pick a dinosaur to trap in the tar.

Then back outside to burn off all that chocolate power!


Happy Birthday, J. I love you buddy.

Wednesday, April 6, 2011

Meet Benjy


My first softie and totally designed by me!!! With lots of help from Posie Gets Cosy's book "Stitched in Time" which shows you how to turn a drawing of a quadruped into a softie by adding a stomach/inside of legs gusset. I'd been wanting to try it for a while and it was totally easy.

The things I learned: make sure all the seams are double stitched. I've already repaired the legs two times where a seam split. I'd also recommend using a small zig zag rather than straight stitch, for the same reason. Also, when making brontosaurus softies for assertive children, over stuff the neck and tail, or they will morph from bold upright appendages to limp handles for dragging.

And you can't see it but there is a tiny embroidery heart where a heart should be. Because who doesn't need to know how much their dinosaur loves them?

Tuesday, April 5, 2011

Welcome Spring!


Hello to everyone visiting from Pinterest, Momtastic or Modern Parents Messy Kids!

We had some toddler guests over to our house a couple of weekends ago and look what we did! A fancy flower garden in our front hall and in the office art area. Thank you Valerie of Frugal Family Fun Blog for the idea.

This was a super easy craft and very easy for young children (2, 3, and 4). And it didn't take a long time to set up. I get a bit miffed with kid craft projects that take me a precious hour to put together for 5 min of crafting time!

Valerie used flower-shaped postit notes, but I couldn't find any without going to more stores than I wanted to, so I bought a pack of 4 pastel colors and before the activity I cut them into petal and leaf shapes. By cutting about 5-6 sheets at a time each flower had a little "petal pack" that the toddler could use. We also had some left over heart shaped postits from Valentine's day crafting, so we used those for petals too. I dug out a roll of green package ribbon and we taped that up for stems - the taping was an in-demand toddler activity, even more so than sticking the postit note petals! Go, fine motor skills, go! Finally, we had the littlest ones help with sticking label "dots" for the center of the flowers the bigger ones had made.

The kids were really cooperative about this activity - I don't know if it was just because we timed it right or because I'm starting to get better at keeping activities short and focused. After a flower fury of five minutes or so, we all raced outside for play. The only clean up was to put the unused petals and scissors up out of reach! Definitely my kind of kid craft.

Thank you Valerie and Stephanie!


Posted by Picasa

Sunday, April 3, 2011

Dyeing to Wear Dark Brown


Mr. Sycamore's hat had faded from this color to tan, and he nicely asked me to magically turn back time. I haven't used RIT dye in ages, I thought I'd give it a whirl although I've been reading up on natural dyes and we do have lots of oak trees around - the leaves are supposed to give a dark chocolatey brown. But, that would be months away! While I had the dye bath around, I also dyed these thrifted napkins which I had to admit were more of an off-white greyish color and not all that appetizing to use. Then I went a step too far and dyed some towels - but without enough dye left they turned a wierd burgundy - kind of a deep pepto bismal. I'll wait to show them until I can dye them to something not quite so hideous.
Related Posts with Thumbnails